I took the bike out on Monday December 24th. The temperature was 37 degrees! I do not have heated gear at the moment. ( waiting for the bike show in NY in Jan) So I just bundled up in layers. I swapped out my riding jacket for my ski jacket and some snowmobile gloves the cover my wrists almost mid for arm. I was snug as a bug. I left the house and traveled toward the shore. I had not had a chance to see the devastation of the NJ beaches from hurricane Sandy up close. As I drove thru Red Bank on Navesink River Road Past the huge houses on this great twisty road I continued on into Highlands over the Sea Bright Bridge and into Sea Bright NJ
In Sea Bright I got to see the after effects of the storm. From the point just after the bridge to Monmouth Beach the area is devastated. Almost all of the business that are on the main road are gone, just gone. Boarded up and gutted. Pizza places, dry cleaners, ice cream parlors, restaurants, grocery stores, clothing stores are all gone. Above the store fronts are apartments that are also cleaned out. It was a tough site to see. All of the beach clubs on the Ocean site are also destroyed. For those of you that never have been the this part of the NJ shore it was and will be again, a beautiful place but now it is in ruins.
I continued down Ocean Boulevard towards Long Branch. As I passed thru Monmouth beach the devastation continued. The water crested above the sea wall and the fist floor of a number of houses were flooded. Boarded up property everywhere. Then after I passed a traffic light and entered Long Branch everything changed and it was as if nothing happened. There were still some effects of the storm but no major damage. It was surreal to see. I pulled into Pier Village The board walk was a little torn up but still open and the shops in the center were open for business. I stopped at the coffee shop to warm up. Removing some of my many layers and getting something warm to drink I realized that I was cold but not freezing. The layers worked! I spoke to the gal at the counter about the storm and she said while they lost power for a while nothing flooded and no windows broke. She was grateful because she could still go to work. The folks in Sea Bright will not be returning for some time.
After warming up a bit I headed home. I took the scenic route to Atlantic Highlands on Ocean Boulevard. A great road with lots of twisty's! I took a spin thru the marina and headed home.
The trip was only 45 miles or so but just being on the bike on Christmas Eve was the best! I returned a little colder than I would have liked but it was totally worth it!
Thursday, December 27, 2012
Friday, December 14, 2012
Clearwater Lights New LED's!
 |
| Insatal manual and crash bar mounts |
 |
| The dimmer switch. |
 |
| Add caption |
Because I added lowers to the bike I can not mount them on the front forks. So I will be adding them to the crash bars. This is a separate Kit for the crash bar mount. Also I am not technically savvy enough to perform this installation my self so I will be going to the dealer to have them put them on.
 |
| About 2" |
 |
| About 2" |
 |
| Crash bar mount in back of light |
More updates follow.


Monday, September 17, 2012
Saddle Bag Locks
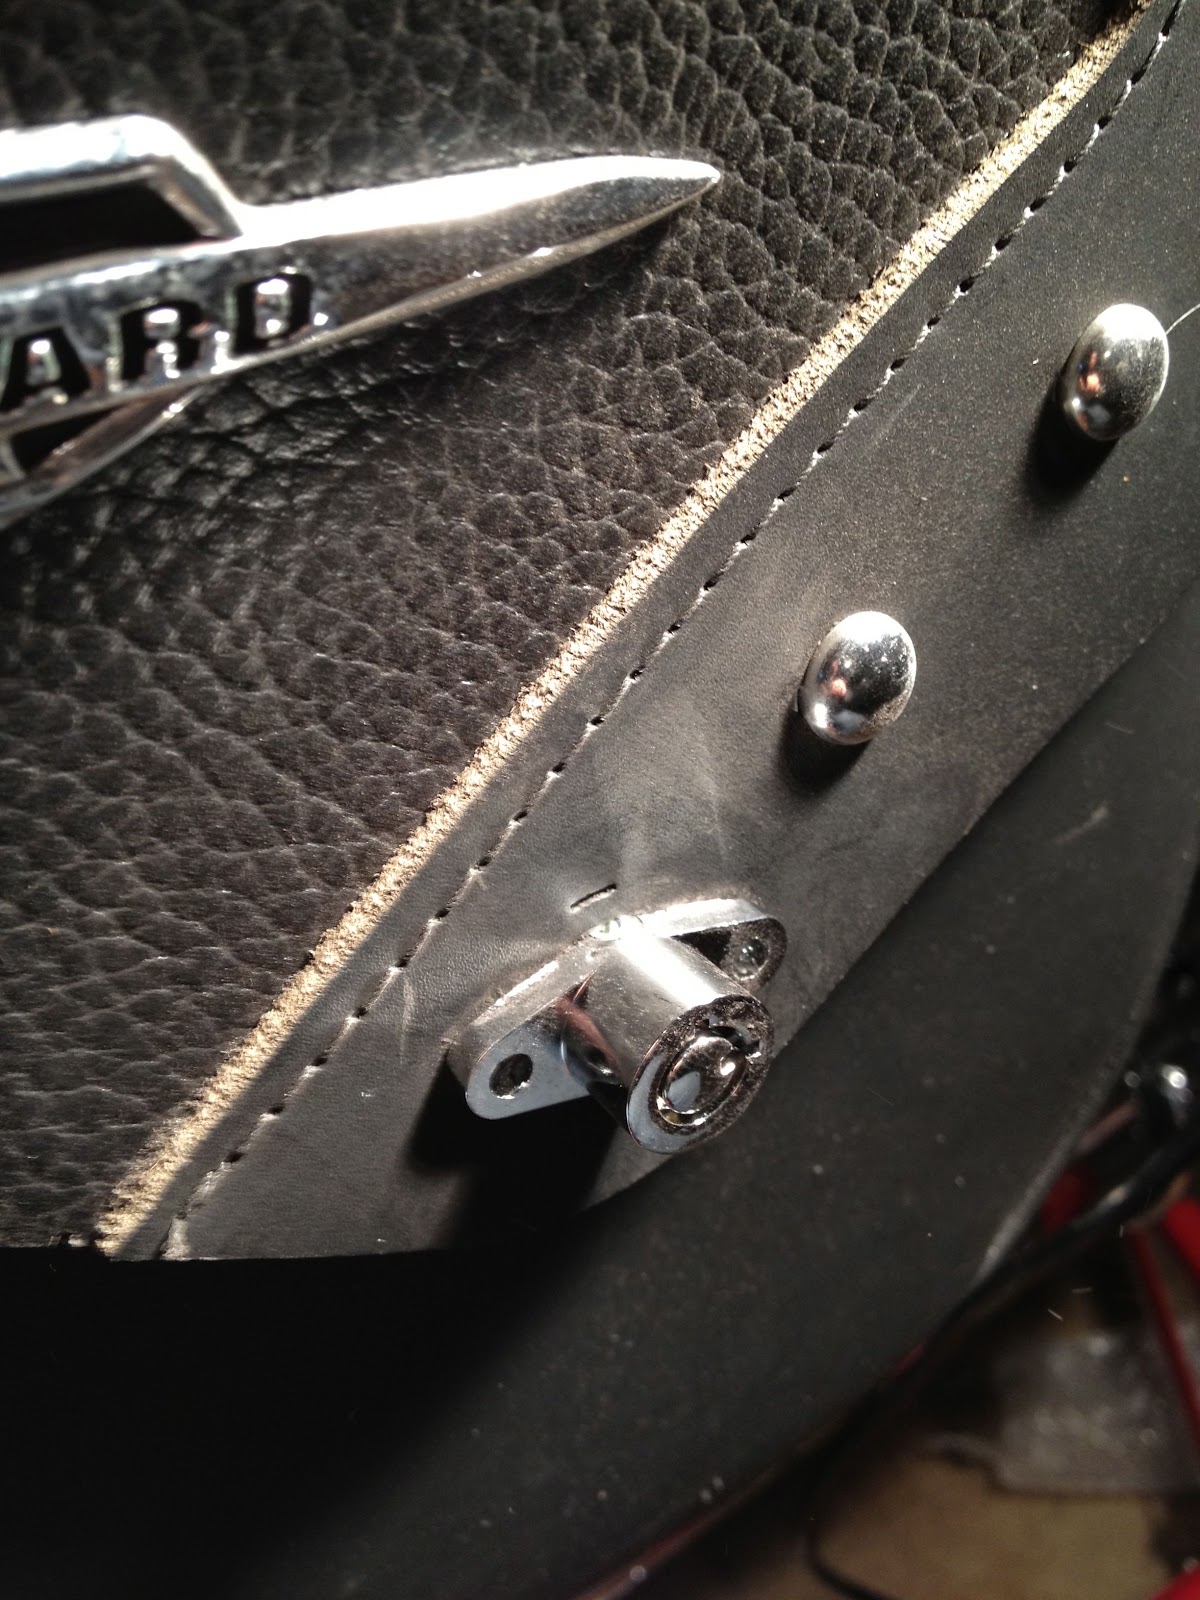
I finally added locks to the saddle bags this past weekend. One of the concerns we all have is when leaving our bike at the store, restaurant, Mall , or the beach is other people stealing our stuff. I don't keep valuables in the bags, but tools cost money and losing them would be a major pain in the tush. The stock bags from Suzuki have thumb locks. I did a lot of research on line and found a post on the Suzuki Volusia Forum http://www.volusiariders.com/47-custom-mods/217728-saddlebag-locks-my-c50t.html The mod looked fairly easy so I gave it a try.
It took about an hour to do both sides and I am really happy with the results. The part is a Harley Davidson part. http://www.surdyke.com/AdvPartInfo.asp?PartNumber=90300017 I bought it from this retailer too.
I have had them in my garage for about 4 months and finally found the time to put them on the bike.
What you need to do this quickly:
 Dremel tool Always wanted to get one and this was a good reason to do it!
Drill with 5/8 bit.
Small crescent wrench
Phillips head and flat screwdriver.
Needle nose pliers.
Exacto knife.
The process. Remove the bezel from the bag lid. This is simple, just open the tabs on the inside. Pop it off with a screwdriver. Put the lock on the center of the hole and mark the top and bottom. You will need to grind the hole to a round shape. Yea! Dremel action! I goes with out saying but wear some eye protection you will be grinding in close.
Next grind off the Thumb lock rivets on the inside of the bag. Make sure you remove everything from the bag this is a dusty operation. Once the thumb lock is off you need to make the hole for the lock base. This is where you drill the larger hole into the bag. Use the grinder to make the edges round and smooth. You will need to drill the small holes for the lock screws.
Once installed you have the option to lock or not. And while this is not Fort Knox security, I have a little peace of mind when leaving the bike in some strange parking lot. It is an easy mod. Take your time and you can get similar results.


It took about an hour to do both sides and I am really happy with the results. The part is a Harley Davidson part. http://www.surdyke.com/AdvPartInfo.asp?PartNumber=90300017 I bought it from this retailer too.
I have had them in my garage for about 4 months and finally found the time to put them on the bike.
What you need to do this quickly:

Drill with 5/8 bit.
Small crescent wrench
Phillips head and flat screwdriver.
Needle nose pliers.
Exacto knife.
The process. Remove the bezel from the bag lid. This is simple, just open the tabs on the inside. Pop it off with a screwdriver. Put the lock on the center of the hole and mark the top and bottom. You will need to grind the hole to a round shape. Yea! Dremel action! I goes with out saying but wear some eye protection you will be grinding in close.
Next grind off the Thumb lock rivets on the inside of the bag. Make sure you remove everything from the bag this is a dusty operation. Once the thumb lock is off you need to make the hole for the lock base. This is where you drill the larger hole into the bag. Use the grinder to make the edges round and smooth. You will need to drill the small holes for the lock screws.
Once installed you have the option to lock or not. And while this is not Fort Knox security, I have a little peace of mind when leaving the bike in some strange parking lot. It is an easy mod. Take your time and you can get similar results.
 |
| Flip up the tabs to remove the bezel |
 |
| The original thumb lock |
 |
| Bezel removed. Put the lock in to mark the top and bottom to make the hole round. You will also need to drill holes on the side to insert the face plate. |

 |
| The ground down rivet |
 |
| During the grinding process I used pliers to pop this off. |
 |
| Placed the face plate into the lock to measure where to make the hole round. Also the holes on the left and right of the new bezel. |

 |
| Checking fit of the lock. |
 |
| Installed with Bezel |
 |
| You need to drill this hole into the saddle bag. use the dremel to grind the hole round and drill the holes on the side. |
Dremel Single Speed Rotary Tool Kit With 7 Accessories 100-N-7 (Google Affiliate Ad)Dremel Single Speed Rotary Tool Kit With 7 Accessories 100-N-7 (Google Affiliate Ad) |
| Inside of the bag. I will get some thing to cover these screws. I tried tape but it fell off. I do not want to cut them but just might. |
Thursday, June 14, 2012

721 Miles!
I hit 721 miles this past sunday and brought the bike to the shop for its first scheduled maintenance. I also had new grips installed by the dealer. I went with the Kuryakyn ISO grips and a throttle boss. I noticed a difference right away. I am not sure if I will need to add handle bar weights but time will tell. The stock grips do have handlebar weights so I may have to add them sooner than later. I also added engine guards and high way pegs. I purchased the show chrome bars and Kuryaking pegs from here. The price was right the reviews were great and they bolted on quickly. I made sure to use loctite to keep the bars secure. As for the pegs I went with adjustable pegs. I set up 3 different configurations to get comfortable. Now I have them low just off the footboards. I plan on a long ride this weekend so this will be a good test. Up to this point I have not had the bike above 60 mph. Keeping with in the breaking recommendations. However after I picked it up today I did open it up to about 70 mph.

 Most of the 700 miles has been from my house to the beach. I am fortunate to live near the Jersey shore so traveling to Sandy hook and then south is a nice ride with some great scenery. It is also all back roads to the beach through small towns so I was not able to open up the throttle. That will change this weekend. I am off to the parkway to go further south. More later.
Tuesday, June 12, 2012
Wednesday, April 25, 2012
The latest additions to the bike.
Well I have 250 miles on the C50. It has been so much fun to ride this bike. I can feel the gears getting smoother during shifting and working our the break-in period. I still have not had the bike over 60 mph yet. I added lowers to the front forks to cut down the wind buffering. They made an immediate difference. I purchased them here. They took about 20 minutes to install.


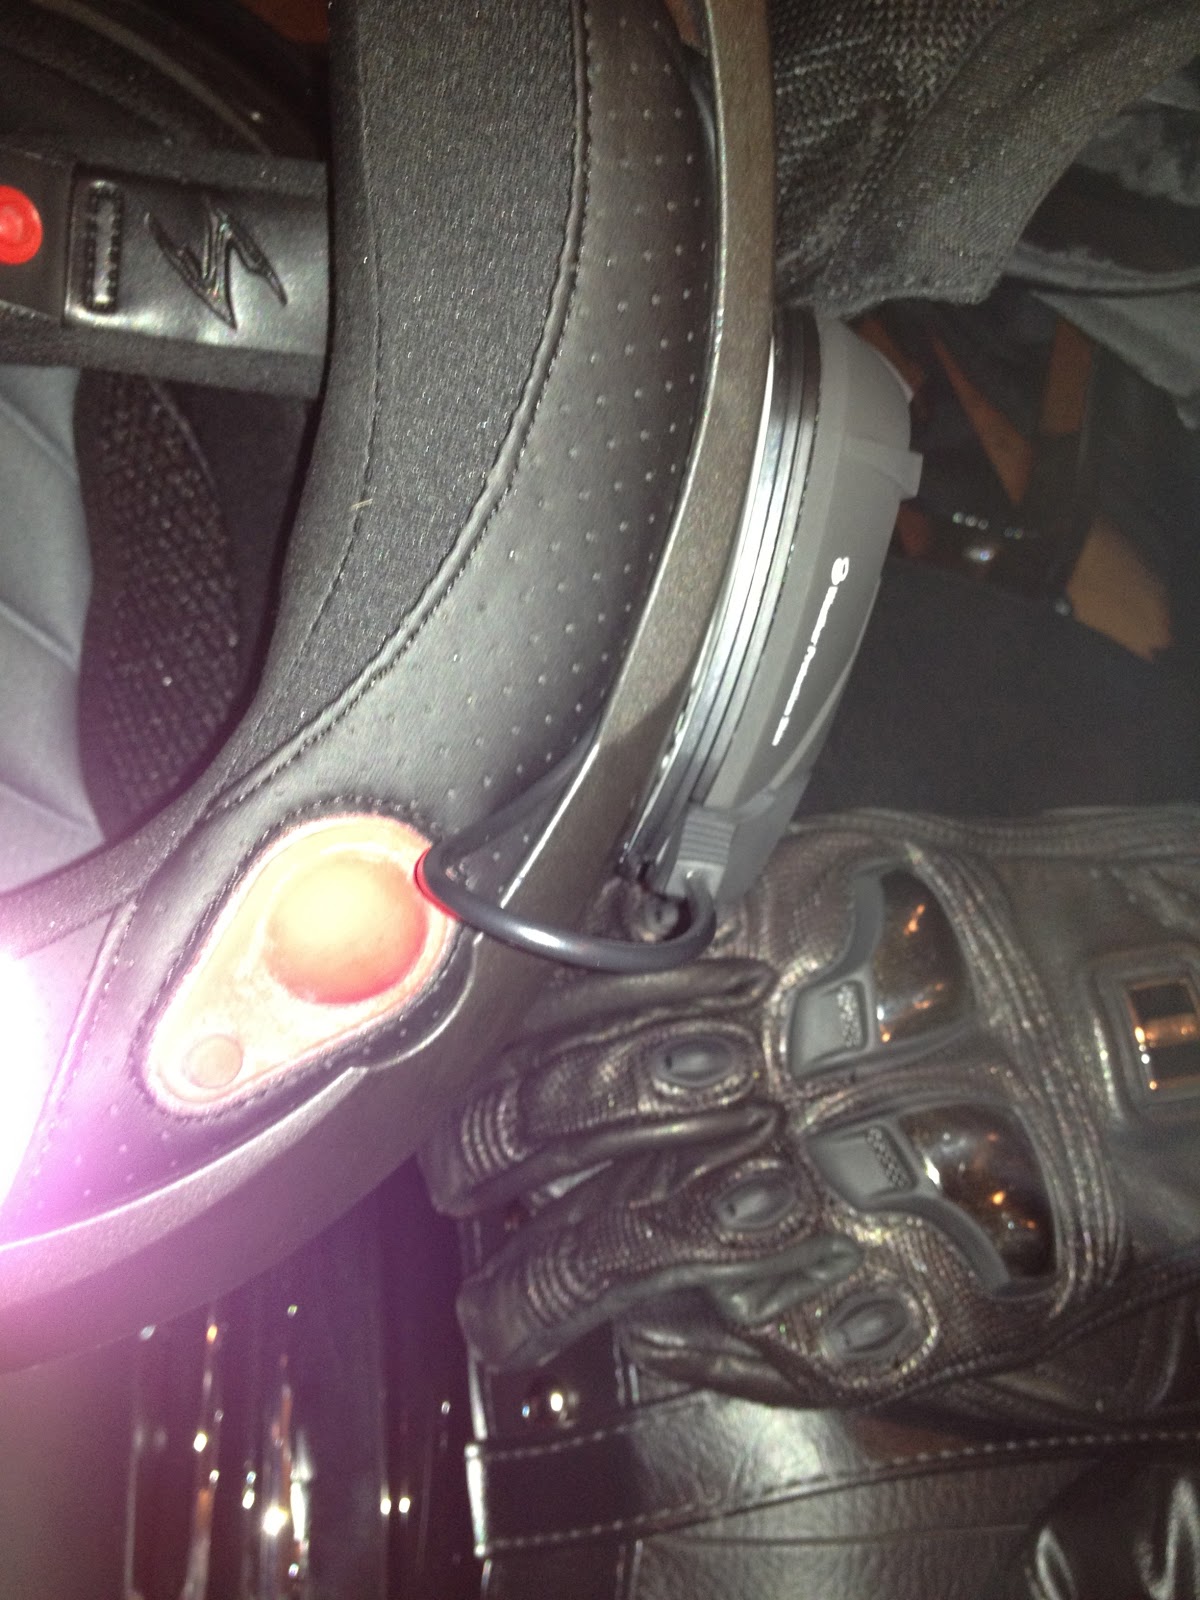
The next item that I added was the interphone F5 bluetooth wireless head set to my helmet. I purchased them from here. These guys had the best price on the unit. The set up was very easy. I called some friends from the road and they did not know I was driving on the bike until I let them in on the secret! Now we can conference calls on the road! The very cool thing was the streaming of music to the head set and the turn by turn directions that I can hear from the gps.
 |
| The Bluetooth unit. |
 |
| I used the tape to mount to the outside of the helmet. The unit comes with another hard mount as well. |
 |
| Mounted with the Bluetooth unit. |
 |
| Wires have been tucked under the padding. |
 |
| The unit comes with two different mic/head set combinations. I have a convertible helmet that can change from a full face to 3/4. This mic will work with 3/4 helmets. |
Installing the head set in the helmet was simple. I used the adhesive tape to mount the unit on the side of the helmet. Then I ran the wires under the padding keeping them out of the way. The paring to the iPhone was simple and straight forward. I highly recommend this head set. The sound was great and the phone calls were clear. I have yet to hook up the additional unit to conduct a conference but as soon as I do I will update the blog.
Friday, April 6, 2012
4/6/2012 Welcome to the Machine.


What a Great Day! I picked up the bike today at around 11:00 am. After reviewing some of the features and adjusting the mirrors I was off! I went for a quick ride then back home to complete some work, (calls email etc.) Then I took off for about an hour. Just to get a feel for the bike and blow off the dust. I took a couple of back road with lots of twists and turns and wonderful scenery. I ran a couple of errands then picked up my daughter for a spin. We took the bike to the beach (Sandy Hook, NJ.) Then drove down Ocean ave and into Rumson. We stopped off for a quick bite to eat and returned home. Here is the mileage for the first day!
 |
| 82 miles on the first day. |
The Powerlet and the back rest are fairly simple installations. In fact there is YouTube video on installing the back rest and the Powerlet folks have a really great web site with installation videos and download able instructions.
Here are some pics of the installation on my new C50T.
 |
| Remove the passenger seat. |
 |
| Remove these two screws |
 |
| Place the back rest on the mount for the back seat. Actually this holds down the front as well. |
 |
| Completed back rest mount. |
 |
| Close up of the the completed assembly. |
 |
| New Backrest. |
 |
| The wire from the wiring harness. |
 |
| I followed the clutch cable keeping the wires neat and tidy. |
 |
| I followed the other cables and wires under the plastic cover to the battery. |
 |
| The wire to battery up high away from the heat. |
 |
| Attaching to battery. |
 |
| The Mount with the ram mount and the iPhone connector. |
 |
| I bought a chrome ram mount. |
 |
| This is the mount for the iPhone. |
 |
| Another angle. |
I would say that this took about and hour and a half to complete. Figuring out how to run the wire took some time. The end result is that I can charge my iPhone and use it for my GPS.
The next few mods will be adding locks to the saddlebags and hooking up the bluetooth in the helmet. I also think I need to get some lowers to cut the wind blast. But more on that later. Happy Easter!
Subscribe to:
Posts (Atom)